WordPress Website Design & Development
July 25, 2023
What is AJAX?
August 1, 2023Are you interested in adding Google Analytics to your WordPress website?
Understanding your website's audience behavior is essential for achieving success. Google Analytics offers a free and comprehensive way to gather valuable traffic statistics and insights.
In this guide, we will highlight the significance of Google Analytics and provide a step-by-step tutorial on easily installing it on your WordPress site.
The article will be divided into three main sections. Firstly, we'll discuss the importance of Google Analytics and its role in helping your website grow. Secondly, we'll guide you through the process of creating a Google Analytics account and demonstrate various methods to install it on your WordPress site. Lastly, we'll explain how to access and interpret your traffic reports within Google Analytics.
By the end of this article, you will have a clear understanding of why Google Analytics is vital and how to leverage its powerful features for your website's success.
Below is a brief preview of the topics covered in this article:
Let’s get started!
The Significance of Google Analytics for Bloggers
After establishing a blog, your primary objective is to attract increased traffic and gain more subscribers. Google Analytics plays a crucial role in enabling data-driven decision-making by presenting essential statistics that provide valuable insights. With Google Analytics, you can access information such as:
Who visits your website?
This aspect of analytics reveals the geographical distribution of your audience, the web browsers they utilize to access your site, and other significant details such as screen resolution, JavaScript and Flash support, language preferences, and more.
This data holds immense value as it can be utilized in various ways. When designing a custom website, you can leverage this user data to ensure compatibility with your target audience.
For instance, if a majority of your users do not have Flash support, it would be prudent to avoid incorporating Flash elements into your site. Similarly, if most of your users have a screen resolution of 1280 or smaller, you can optimize your design to be compatible with that specific resolution. By tailoring your website based on these insights, you enhance user experience and engagement.
What are the actions taken by visitors on your website?
You have the capability to monitor the paths users take on your website, the duration of their visits, and the bounce rate (percentage of users who leave the site after the first visit).
By utilizing this information, you can effectively reduce the bounce rate and enhance your pageviews.
Additionally, you can identify your most popular articles, those that may not be performing as well, and determine the type of content your users are seeking. Armed with these insights, you can optimize your content strategy and provide more of the sought-after content to cater to your audience's interests.
At what time do people visit your website?
By identifying the peak hours during the day for your site, you can determine the optimal time to publish your posts. If these peak hours correspond to a different time zone than yours, you can schedule your posts to go live during those specific hours. This way, you can maximize the visibility and engagement of your content, reaching a larger audience during the most active periods.
How do visitors discover your website?
This segment of the analytics reveals the various sources from which users arrive at your site. For instance, it shows whether they use search engines, directly enter your website's link, or click on referral links from other sites.
Furthermore, it provides insights into the percentage of visitors coming from each of these sources. Google Analytics presents a breakdown of these categories, specifying the search engines responsible for the most traffic, such as Google, Yahoo, Bing, and others, if the source is a search engine.
Analyzing the referral sources helps you identify key areas of focus. For instance, if Facebook is your top referral source, you might consider creating exclusive content for your Facebook audience to make them feel valued and engaged.
Similarly, if an external website is driving significant traffic to your site, you may explore potential partnerships with that site, such as guest post exchanges or other collaborative opportunities to further leverage this traffic source.
How do users engage with your content?
Google Analytics provides insights into how users interact with the content on your website. It presents data on the percentage of users who click on specific links and offers much more valuable information.
Through content experiments in Google Analytics, you can conduct A/B split tests to determine what content resonates best with your audience and helps you achieve your goals.
By understanding user interactivity, you can tailor your content to better suit your audience's preferences and needs. By obtaining answers to the aforementioned questions, you can concentrate on effective strategies for your site while avoiding approaches that yield limited results.
In essence, by eliminating guesswork and focusing on meaningful statistics, you empower yourself to make data-driven decisions that can significantly impact the success of your website.
How to Create a Google Analytics Account
Google Analytics is accessible without any cost, and signing up merely requires a Google or Gmail account. The registration process is straightforward, and you can easily create your Google Analytics account by following the step-by-step instructions provided below.
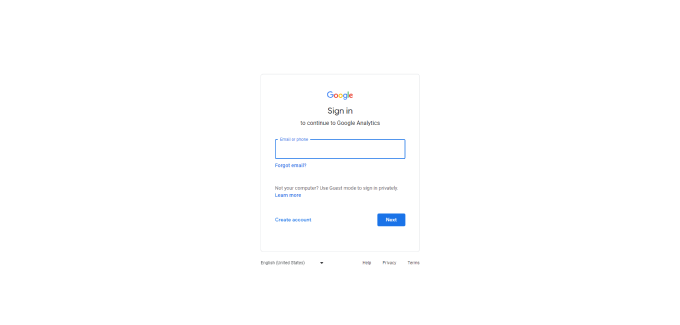
Step 1: To initiate the sign-up process, visit the Google Analytics website. Once you are on the site, click on the 'Get started today' button.

Next, you will be prompted to log in using your Google account credentials.
If you already possess a Google or Gmail account, you can utilize those credentials to sign in. Alternatively, if you don't have an existing Google account, you can proceed to create one for yourself.
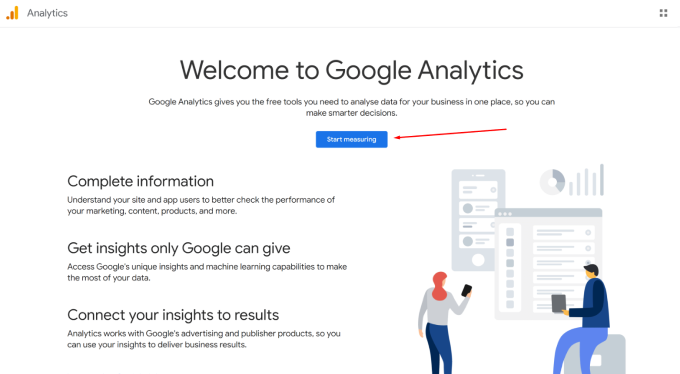
Step 2: After successfully logging in with your Gmail account, a welcome screen similar to the one depicted below will appear.
This is the section where you can sign up for Google Analytics using your Gmail account. Simply click on the 'Start measuring' button to proceed.
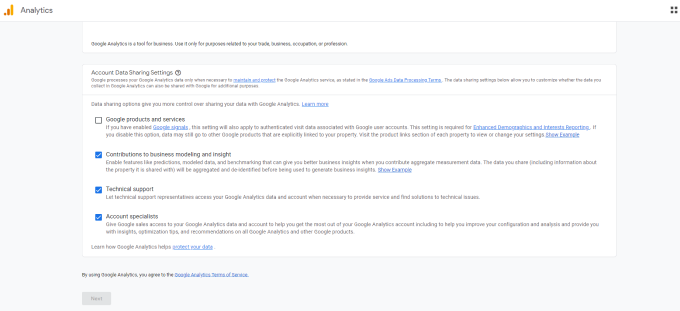
Following that, you will be prompted to input an account name.
This internal name can be anything you prefer, such as your business name, as it will be utilized for organizational purposes.

Google Analytics will display various account data-sharing settings.
These settings grant you control over the sharing of your Google Analytics data. If you wish, you can retain the default settings and proceed to the next step.
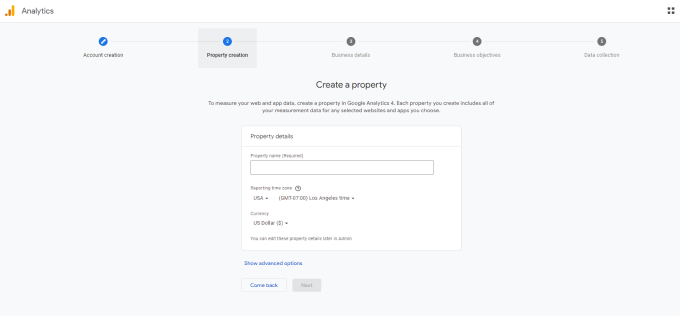
Step 3: On the subsequent screen, you will be required to establish a Google Analytics property.
Google has introduced a recent version known as Google Analytics 4 or GA4, which allows you to track both your website and mobile apps within the same account. This latest version offers new features, metrics, and a distinct interface for your reports.
Please proceed by entering a property name, selecting your preferred reporting time zone and currency, and then click the 'Next' button.
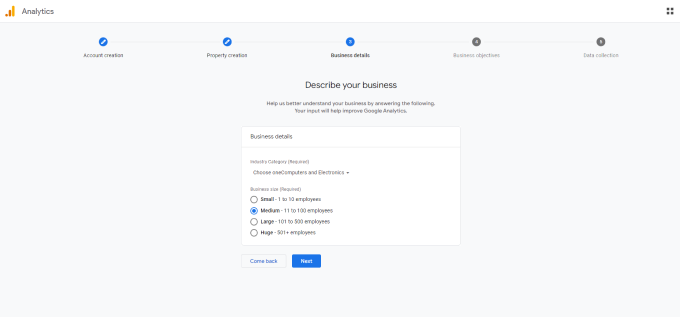
On the subsequent screen, you will be required to choose an 'Industry category' from the provided dropdown menu that best suits your website and select a 'Business size' from the available options.
Once you have made your selections, simply click the 'Next' button to proceed.
Following that, you will need to specify your business objectives and indicate how you plan to utilize Google Analytics for your business. This step will enable the generation of personalized reports tailored to your business needs.
For instance, you can choose from a range of options such as generating leads, driving online sales, raising brand awareness, analyzing user behavior, and more.
Feel free to select multiple options or all of the provided choices that align with your requirements. It is advisable to opt for the 'Get baseline reports' option to ensure that all Google Analytics reports are populated in your account. This way, you can access a comprehensive overview of your website's performance.
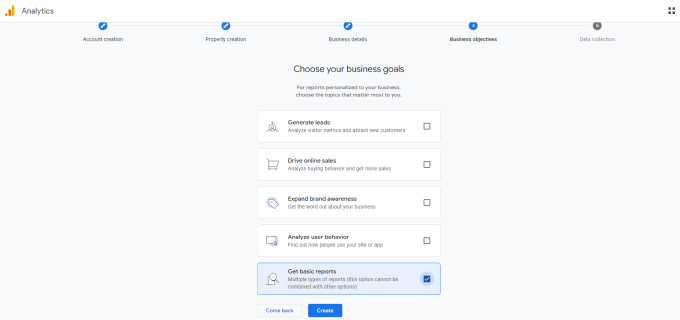
Once you have completed the necessary steps, just click the 'Create' button.
Step 4: At this stage, you will encounter various Google Analytics Web stream options.
Given that we are configuring Google Analytics for a WordPress site, proceed by selecting 'Web' as the platform.
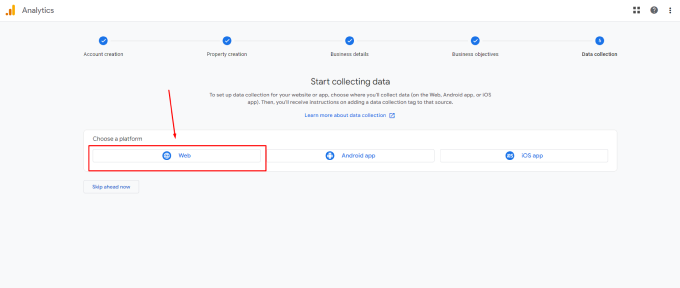
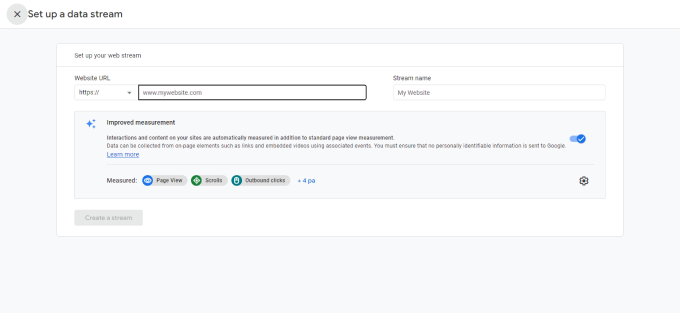
Following that, you will be required to provide your website URL and a Stream name.
By default, Google Analytics will have the 'Enhanced measurement' option enabled. This feature allows you to track various user interactions, including pageviews, scrolls, outbound clicks, file downloads, and more, all within Google Analytics.
Subsequently, you may click on the 'Create stream' button.
Now, you will be able to view your Stream name, URL, ID, and Measurement ID.
Additionally, it will display various enhanced measurements that will be recorded by Google Analytics.
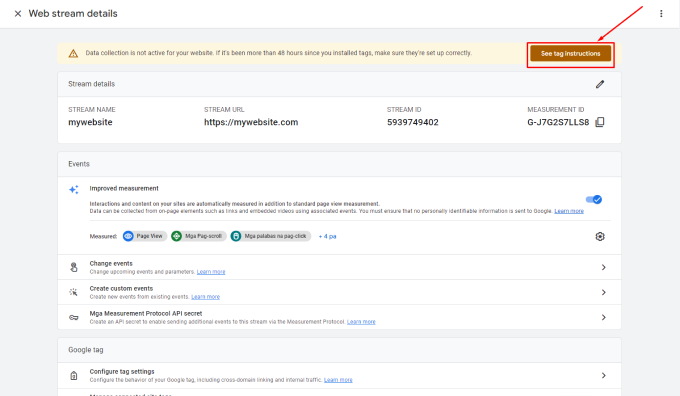
At the top, you'll notice an alert bar that provides instructions on adding Google Analytics to your WordPress site.
Please click on the 'See tag instructions' button. This will lead you to different methods for adding the Google Analytics tracking code to your WordPress website.
How to Install Google Analytics in WordPress
There are several methods available to set up Google Analytics in WordPress. In this guide, we will present three options, with the first being the easiest and the last the most complex.
Feel free to select the method that aligns best with your requirements.
Please note that it's essential to utilize only one of these methods on your website to prevent duplicate tracking of pageviews in your Google Analytics account.
Method 1: Installing Google Analytics in WordPress Using WPCode
To begin, you should retrieve your Google Analytics tracking code (Global site tag) that you copied during Step 4 while setting up your Google Analytics account.
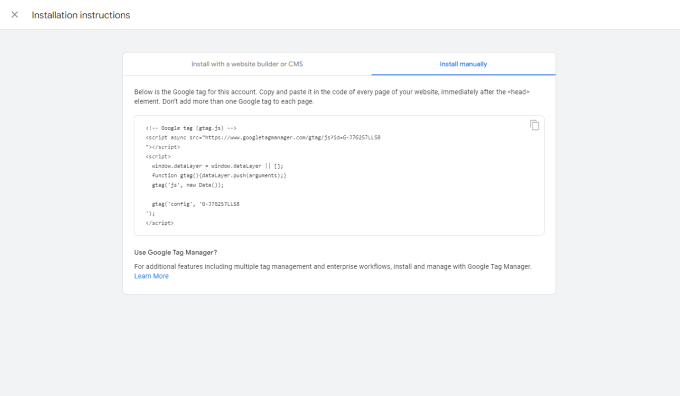
Afterward, proceed to install and activate the WPCode plugin.
Once the plugin is activated, navigate to the Code Snippets » Header & Footer page. Here, you must paste the Google Analytics tracking code that you previously copied into the designated 'Header' section.
Remember to click the 'Save Changes' button to save your settings.
That's it! You have now successfully installed Google Analytics on your website.
Method 2: Incorporating Google Analytics into a WordPress Theme
This particular method is intended for advanced users with a good understanding of code. However, it has its drawbacks as the code can vanish if you switch or update the theme.
Considering the potential issues, we strongly discourage using this method unless you are fully confident in managing code-related challenges.
Initially, you should copy the Google Analytics tracking code you acquired during Step 4. You can find this code in the Web Stream Installation section under the 'Install manually' tab.

Currently, there are two common methods to insert this code into your WordPress theme files, but you should select only one of them (not both).
- Add Code in header.php File:
- Add via Functions File:
Begin by editing the header.php file in your WordPress theme. Then, paste the Google Analytics tracking code you copied earlier immediately after the
tag.Remember to save your changes and upload the file back to your server.
Alternatively, you can include the Google Analytics tracking code in the WordPress functions file. This will automatically add the tracking code to every page on your WordPress site.
To achieve this, add the code to your theme's functions.php file.
Ensure that you substitute the 'Paste your Google Analytics tracking code from Step 4 here' section in the above snippet with your actual Google Analytics tracking code.
Accessing and Viewing Reports in Google Analytics
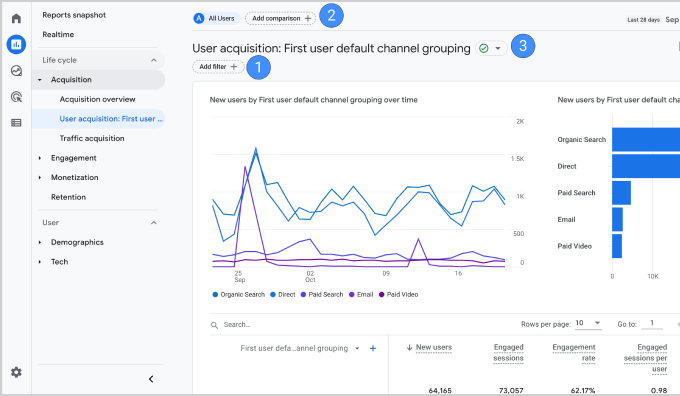
Google Analytics provides a wealth of data obtained from your statistics, accessible through your Google Analytics dashboard.
Upon visiting the dashboard, you will encounter the built-in Google Analytics reports in the left column. Each section is categorized into various tabs, and clicking on a tab will expand it to reveal additional options and data.
