What is wp-config.php?
August 2, 2023
How to Install a WordPress Plugin – Step by Step for Beginners
August 3, 2023Have you encountered a 500 internal server error on your WordPress website?
The 500 internal server error is a frequently occurring issue in WordPress. Due to the lack of additional information provided by the error message, it can be particularly frustrating for beginners.
In this article, we will demonstrate simple methods to resolve the 500 internal server error in WordPress.
Below is a brief outline of the subjects we'll be addressing in this article:
- What is The 500 Internal Server Error?
- What Causes The Internal Server Error in WordPress?
- Fixing The 500 Internal Server Error in WordPress
- Clear WordPress and Browser Cache
- Checking for Corrupt .htaccess File
- Increasing the PHP Memory Limit
- Deactivate All WordPress Plugins
- Switch to a Default WordPress Theme
Let’s get started!
What is The 500 Internal Server Error?
The 500 internal server error is a prevalent issue with web servers. It is not exclusive to WordPress websites and can occur on any type of website.
The numeric code "500" in the error message is an HTTP error code. When searching for this code, you will only find its generic standard description.
“500 Internal Server Error response code indicates that the server encountered an unexpected condition that prevented it from fulfilling the request.“
This error message is a generic catch-all response, indicating that the server couldn't provide a more specific and informative error message when it encountered the problem.
The appearance of the error page varies depending on the web server software (Nginx or Apache) your website uses and the browser you are using.
Below is an example of how the Apache error page might look.
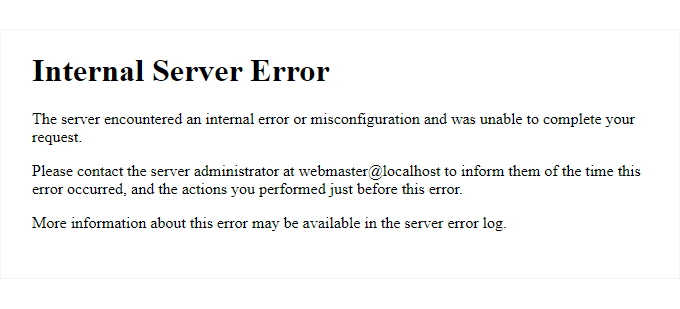
The appearance of the error page might differ when using Nginx and Google Chrome.
Furthermore, if Google Chrome is unable to locate an error page to display, the presentation will be different as well.
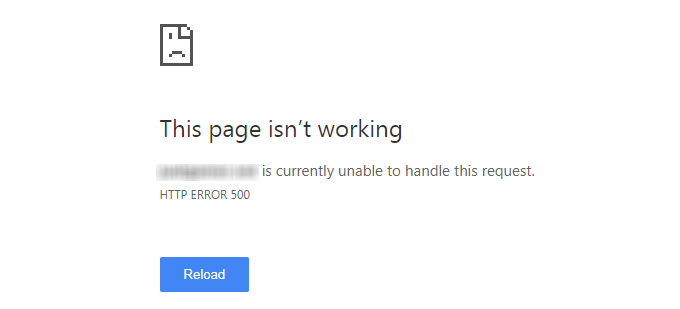
For newcomers, this situation can be exceedingly vexing. There are no hints or messages to guide them in promptly resolving the issue.
Requesting a solution for the internal server error is akin to asking your doctor how to alleviate pain without specifying its location.
Nevertheless, if we are aware of the typical triggers behind this error, we can systematically address them one by one to resolve the issue without causing any further disruptions.
What Causes The Internal Server Error in WordPress?
The occurrence of an internal server error in WordPress is frequently attributed to a corrupted .htaccess file, poorly coded plugins, or the currently active WordPress theme.
Other potential factors known to trigger the internal server error in WordPress include reaching the PHP memory limit or encountering corrupted core WordPress files.
It is worth noting that in certain situations, the internal server error might manifest only when attempting to access the WordPress admin area, while the rest of the site functions normally.
With this in mind, let's proceed to explore the steps for troubleshooting the internal server error in WordPress.
Fixing The 500 Internal Server Error in WordPress
Prior to commencing the troubleshooting process, it is essential to have a comprehensive WordPress backup of your website readily available.
If you can access the WordPress admin area, you can utilize a WordPress backup plugin like Duplicator to generate a complete backup of your website, which we highly recommend.
However, in case you do not have access to the WordPress admin area, you can manually create a WordPress backup using phpMyAdmin and an FTP client.
Once you have a backup in place, you can proceed with the following steps to troubleshoot and resolve the internal server error on your website.
Clear WordPress and Browser Cache
Occasionally, browsers and WordPress caching plugins might mistakenly retain a cached version of an error page.
The simplest solution to address this issue is by clearing your browser cache first.
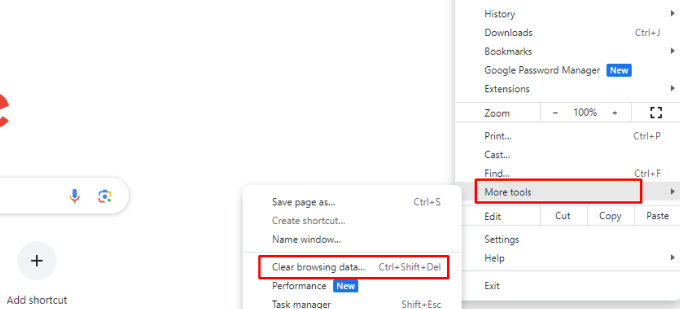
Following that, if you possess access to your website's WordPress admin area, you can clear the WordPress cache by navigating to your caching plugin's settings page.
For detailed instructions, you can refer to our tutorial on how to clear WordPress cache.
Checking for Corrupt .htaccess File
The .htaccess file serves as a server configuration file, which WordPress also utilizes for implementing redirects.
A prevalent reason behind the internal server error is a corrupted .htaccess file.
To resolve this issue easily, you can visit the Settings » Permalinks page within the WordPress admin area and proceed to click the 'Save Changes' button without making any alterations whatsoever.
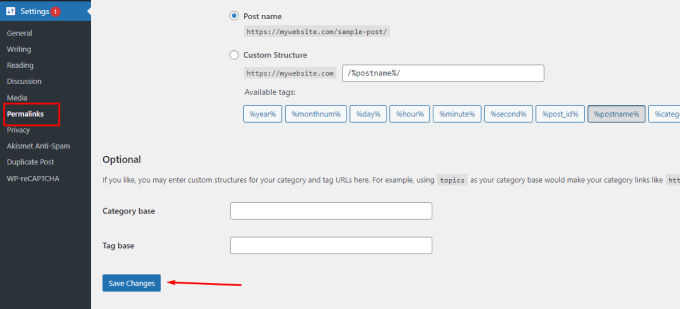
WordPress will attempt to update your .htaccess file or generate a new one for you. Subsequently, you can visit your website to verify if this action has resolved the internal server error.
If the error persists, it's important to ensure that WordPress was able to generate or write to the .htaccess file. Sometimes, file and directory permissions can hinder WordPress from creating or writing to the .htaccess file.
In such cases, you can manually replace the .htaccess file. Begin by logging into your website using FTP or the File Manager app within your hosting account control panel.
Once connected, you'll find the .htaccess file in the same directory where you see folders like wp-content, wp-admin, and wp-includes.
To proceed, simply right-click on the .htaccess file and rename it to something like .htaccess_old. This action will retain the file as a backup, but WordPress won't recognize it anymore.
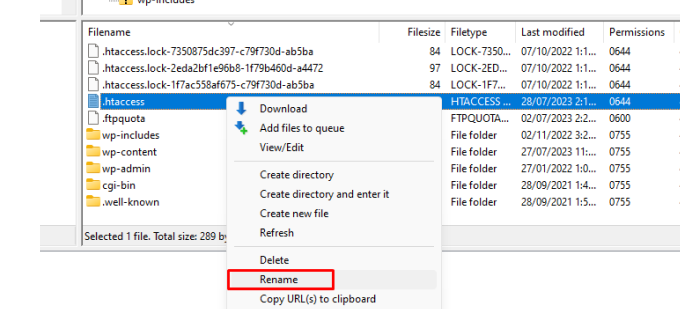
Afterward, you'll need to generate a new .htaccess file.
To do this, navigate to your website's root folder, and in your FTP client or File Manager app, right-click, and then select the 'Create new file' option.
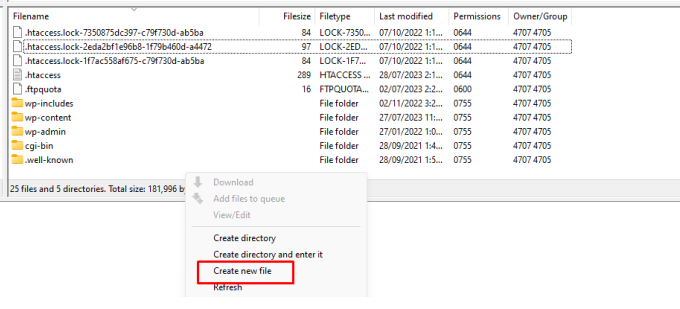
Name the newly created file as .htaccess and click OK to save it.
This .htaccess file is currently empty, and you'll need to add the default WordPress rewrite rules to it.
To proceed, simply right-click on the file, and then select View/Edit in your FTP client or File Manager app.
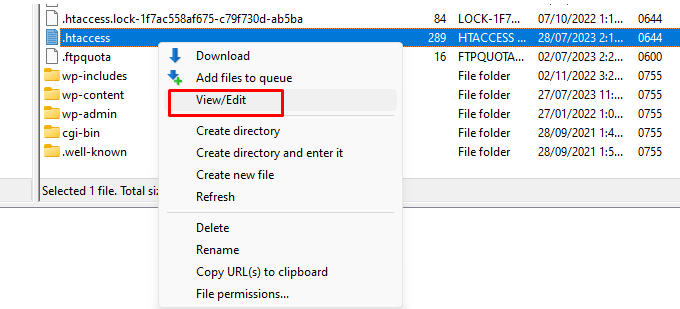
The empty file will open in a plain text editor, such as Notepad or TextEdit. Now, you should copy and paste the following code into it.
# BEGIN WordPress
<IfModule mod_rewrite.c>
RewriteEngine On
RewriteBase /
RewriteRule ^index.php$ - [L]
RewriteCond %{REQUEST_FILENAME} !-f
RewriteCond %{REQUEST_FILENAME} !-d
RewriteRule . /index.php [L]
</IfModule>
# END WordPress
This code constitutes the default rule set used by WordPress. Remember to save your changes and upload the file back to the server.
Now, you can visit your website to determine if this has resolved the internal server error.
If the error has been resolved, congratulations on fixing the internal server error!
Important Note: Before proceeding with other tasks, ensure that you go to the Settings » Permalinks page in the WordPress admin area and click the save button without making any changes. This action will regenerate the .htaccess file with the appropriate rewrite rules, preventing post pages from displaying a 404 error.
If the solution involving the corrupt .htaccess file did not work for you, please continue reading this article for further troubleshooting steps.
Increasing the PHP Memory Limit
Occasionally, the internal server error may occur when a script exhausts the PHP memory limit.
The simplest way to increase the PHP memory limit is by editing the wp-config.php file. However, if you are a beginner, exercise caution during this process, as even minor mistakes in WordPress core files can potentially break your site.
To begin, connect to your WordPress website using an FTP client or the File Manager app in your hosting account control panel.
Within the main folder of your website, locate the wp-config.php file. Right-click on it and select 'Download' to create a backup of the file in case of any issues.
Once you've saved the backup, right-click on the wp-config.php file again and select 'View/Edit' to proceed.
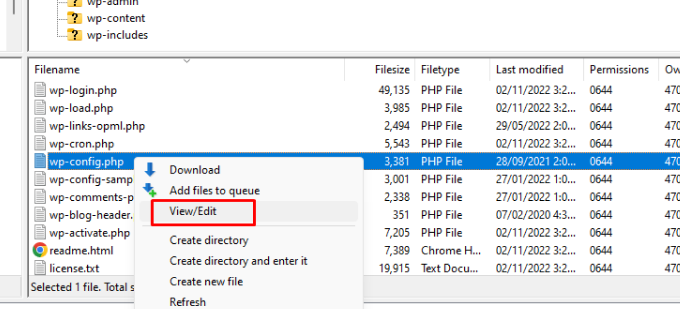
Within the wp-config.php file, you should add the following code just above the line that says 'That's all, stop editing! Happy publishing'.
define( 'WP_MEMORY_LIMIT', '256M' );
For more comprehensive guidance, please refer to our tutorial on how to increase the PHP memory limit in WordPress.
If you encounter the internal server error only while attempting to log in to your WordPress admin or upload an image in your wp-admin, you can address the issue by following these steps:
- On your computer, create a blank text file named php.ini.
- Insert this code into the file: memory=256MB.
- Save the file.
- Upload it to your /wp-admin/ folder using FTP.
Keep in mind that if increasing the memory limit resolves the problem, it's likely a temporary fix. You still need to identify the root cause that is consuming your memory limit.
This cause could be a poorly coded plugin or a theme function. We highly recommend reaching out to your WordPress web hosting company to examine the server logs and help identify the exact diagnostics.
If increasing the PHP memory limit does not resolve the issue, you'll need to continue troubleshooting further.
Deactivate All WordPress Plugins
If none of the previously mentioned solutions have proven effective, the error is likely caused by a particular plugin installed on your website. Alternatively, it could be a combination of plugins that are conflicting with one another.
If you have access to the WordPress admin area of your website, you can easily address this by navigating to the plugins page and deactivating all WordPress plugins.
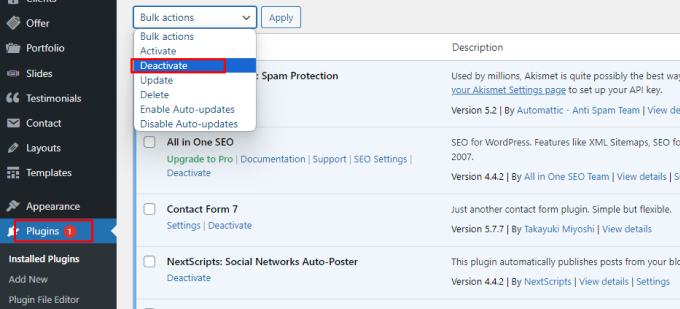
In case you are unable to access the WordPress admin area, you can still deactivate all WordPress plugins using FTP.
Connect to your WordPress website using an FTP client or the file manager app in your hosting account control panel.
After establishing the connection, navigate to the /wp-content/ folder and rename the plugins folder to plugins_deactivated.
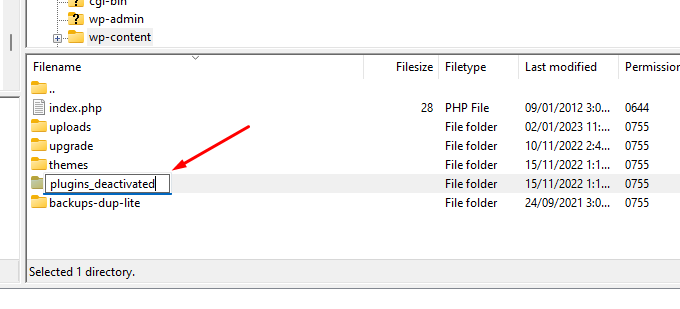
WordPress searches for plugins within the plugins folder. If this folder is not found, WordPress will automatically deactivate all plugins.
Now, you can check your website to see if this has resolved the internal server error.
To restore all your plugins, simply rename the plugins.deactivated folder back to plugins.
However, please note that even after restoration, the plugins will remain deactivated.
You can now begin reactivating plugins one by one and visit your website each time to identify which plugin is causing the internal server error.
For more comprehensive instructions, refer to our guide on how to deactivate all WordPress plugins without using WP-Admin.
If deactivating all plugins did not resolve the internal server error on your website, please continue reading for further troubleshooting steps.
Switch to a Default WordPress Theme
A potential reason behind the internal server error may be related to code within your WordPress theme.
To determine if the theme is causing the issue, you should switch to a default WordPress theme.
If you can access the WordPress admin area, navigate to the Appearance » Themes page. If a default theme is already installed, you can click the Activate button to switch to that theme.

If you do not have a default theme installed, click on the Add New button located at the top and proceed to install a default theme such as Twenty Twenty-Three, Twenty Twenty-Two, etc.
In situations where you lack access to the WordPress admin area, switching to a default theme is still possible.
Simply connect to your WordPress website using an FTP client and navigate to the /wp-content/ folder.
To create a backup, right-click on the themes folder and download it to your computer.
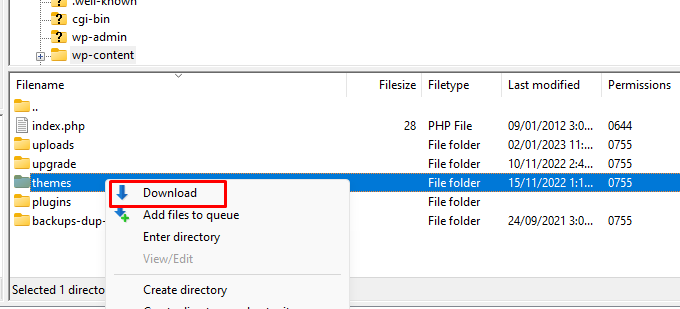
Afterward, proceed to delete the themes folder from your website. Once it is removed, create a new themes folder.
The newly created themes folder will be entirely empty, indicating that no WordPress themes are currently installed.
Next, visit the WordPress themes directory and download a default WordPress theme to your computer.
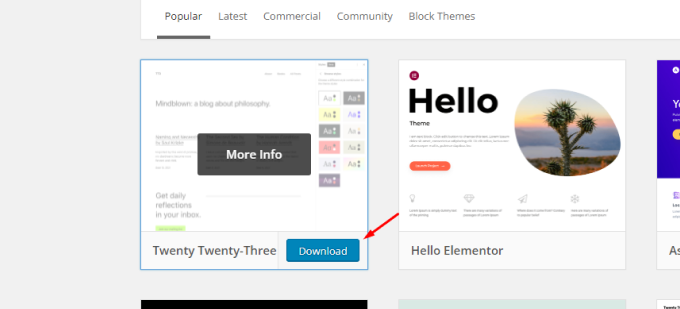
Subsequently, your browser will download the theme as a zip file to your computer.
Locate the downloaded file on your computer and proceed to unzip it. Windows users can unzip the file by right-clicking on it and selecting Extract All. Mac users, on the other hand, can double-click on the zip file to extract its contents.


